Welcome back to Couch Surfer Crochet! This is the last week of the Stash Buster Granny Square Crochet Along! I hope you have enjoyed working on this CAL! We are now on the final week : the BORDER!! These squares have been so much fun to create and I truly love the finished blanket. This week I will teach you how to add a border to this blanket. I’ll also show you a trick that I use to make finishing a blanket go much quicker!
The photos you have shared in the Facebook group are absolutely stunning! You all have inspired me so much with your fabulous work and your awesome color choices! Maybe you will be inspired to try this pattern again with a different set of colors. I think I might do just that!
For a refresher, all of the previous weeks can be found here:
Week 1
Week 2
Week 3
Week 4
Joining
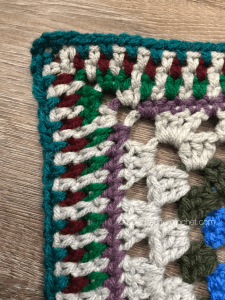
I wanted the border to tie all of the squares together nicely, so I chose to go with the Moss Stitch (sometimes known as the Linen Stitch). It creates really sharp corners. Using this stitch allows me to create a cool look around the edge and use some of the colors in the blanket as well!
Here’s a video link for better detail on the moss stitch edging:
We are still using the I/9 5.5mm hook for the border. I used a little more of the joining color, and three random colors I had used elsewhere in the blanket.
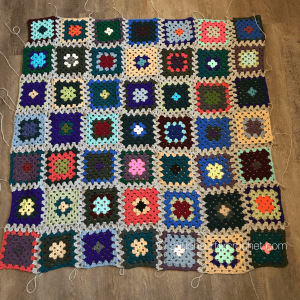
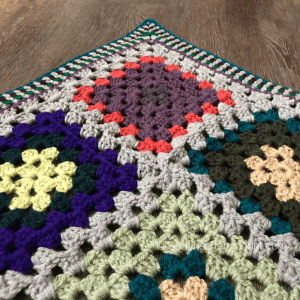
After joining all the squares together you should have something that looks like this:
R1 & R2:
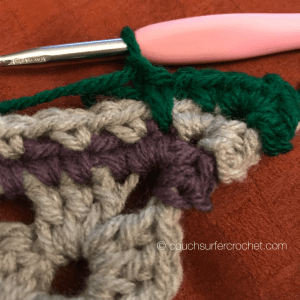
To begin, start in corner and do 2 (TWO) more rounds of the granny stitch all the way around your blanket using the same color you used to join. This will keep it matching with the two rows you created between each square during joining.
R3:
Pick any color from your squares, starting in corner: ch 3 (counts as sc and ch 2), *sc in each st and ch sp across to corner, [sc, ch 2, sc] in corner, repeat from *, sl st to first sc to join
R4:
Using joining color, starting in corner: *(sc, ch2, sc) in corner, ch1, sk next st, [sc in next st, ch1, sk next st] repeat to corner, repeat from *, sl st to first sc to join
R5:
Pick any color from your squares, starting in corner: *(sc, ch2, sc) in corner, ch1, sk next st, [sc in next ch1 sp, ch1, sk next st] repeat across side, sl st to first sc to join
R6-R8
Repeat round 5

I chose to end my blanket on one of the colored rows, but it would also look great if you finish it in the joining color to really tie everything together! To do this, just Repeat Row 5 one more time.
I hope you all have enjoyed working on this project! I am happiest when I am creating. I love to see how all these bit and bobs of color can turn into this amazing work of art! Please, please, please feel free to share your work with me! I would love to see your progress and finished pieces. Half the joy of creating is sharing it! You can post your work here in the comments, on my Facebook page, or you can join the Couch Surfer Crocheters FB Group!
If you are on Instagram and want to share there, please tag me @couchsurfercrochet. I’m on Pinterest and Twitter as @couchsurferarts!
Looking for other patterns to try?! Check out my ETSY shop or my Ravelry store!
If you want to try a different style of CAL, check out the Mixed Stitch Blanket CAL. It’s made in rows with lots of colorful stripes!
Happy crocheting!