Changing Chevrons CAL Week 1
Welcome to Week 1 of the Changing Chevrons Crochet Along! If you missed the intro post, let me catch you up on how all this will work! Every two weeks (every other Monday), I will post 10 – 15 rows of the pattern, including all stitches and variations required. I’m posting every two weeks to give you plenty of time to learn the new stitches and complete all of the rows for that section.
Week 1: March 26
Week 2: April 9
Week 3: April 23
Week 4: May 7
Week 5: May 21
Week 6: June 4
Week 7: June 18
Week 8: July 2
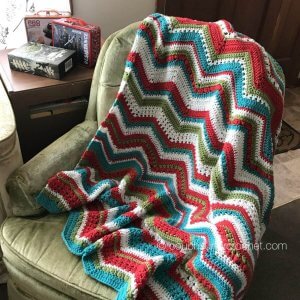
For this project I chose to use 4 colors. Each time I changed to a new stitch, I switched the color I was using. This gives it a “random” look since you aren’t always repeating colors and stitches together. Feel free to use as few or as many colors as you would like for your project!
I used:
Impeccable Big! Yarn by Loops & Threads in Aqua (1 ball – 858 yds)
Impeccable Big! Yarn by Loops & Threads in Coral (1 ball – 858 yds)
Loops & Threads Impeccable Yarn in Forest (2 balls – 277 yds each)
Bernat Baby Sport Big Ball Ombre Yarn in Chiffon Print (1 ball – 893 yds)

To begin this project you will need to determine the number of chains you need to start with.
Begin by chaining any multiple of 28 + 18 (i.e. 130, 186, 242, etc., and be careful not to chain too tightly!). With my worsted weight yarn and my I/9/5.5mm hook, I chained 186 total to make my throw about 46″/116cm wide, but you make yours however long you want to! As long as it’s a multiple of 28 plus 18 you’re fine! Double check your starting chain count so you don’t have to start over later.
Start with foundation chain. I chained 186 if you want to make your blanket the same size as mine!
Ch 186
R1 (color 1): Dc in 4th chain from hook (Chain and dc counts as 2 dc in same stitch), dc in each of the next 5 ch, *dc3tog in next three chains (bottom of chevron), dc in each of the next 12 chains, 3 dc in next chain (top of chevron), dc in each of next 12 chains, repeat from * across until the last 9 chains remain. End of of row is dc3tog in next three chains, dc in each of next 5 stitches, 2 dc in ch st, turn
R2 (color 1): Ch 3, dc in same st, dc in each of the next 5 st, *dc3tog in next 3 st, dc in each of the next 12 st, 3 dc in next st, dc in each of next 12 st, repeat from * across, dc in each of next 5 st, 2 dc in ch st, turn
***see Special Stitches page for step by step photos
[yarn over, insert hook around post of previous dc from right to left, yo and pull loop through] 3 times in same place (7 loops on hook), yo and pull through first 6 loops on hook, yo and pull through last 2 loops.
R3 (color 3): Ch 3, dc in same st, dc, bead st, sk sp, dc, dc, bead st, sk sp, dc3tog, *dc, dc, bead st, sk sp, repeat from * to peak, 3 dc in peak, repeat again from * to valley, dc3tog, repeat from * across, 2 dc in ch st, turn

This next row is the “Herringbone Stitch.” (hbdc in pattern)
hbdc – Yarn over, insert hook into the next st, yo and pull through st and first loop on hook, yo and draw through one more loop on hook, yo and draw through two remaining loops on hook.
hbdc3tog – yo, insert hook into next st, yo and pull through the st and first loop on hook, yo and draw through one more loop on hook, yo insert hook in the next st and pull through st and first loop on hook, yo and draw through one more loop on hook, yo insert hook in the next st and pull through st and first loop on hook, yo and draw through one more loop on hook, yo and pull through all 4 loops on hook.

R4 (color 4): Ch 3, hbdc in same st, hbdc in each of the next 5 ch, *hbdc3tog in next three chains, hbdc in each of the next 12 chains, 3 hbdc in next chain, hbdc in each of next 12 chains, repeat from * across, hbdc in each of next 5 stitches, 2 hbdc in ch st, turn
The next 3 rows are the “Criss Cross Stitch.”
Skip next stitch and place dc. dc into the skipped stitch.
R5-7 (color 2): Ch 3 (counts as dc), *[sk 1 st, dc into next stitch, dc into stitch before (criss cross made)], repeat from * twice (Side section has 3 criss crosses), *dc3tog. criss cross 6 times, 3 dc in next stitch, criss cross 6 times, repeat from * across, criss cross 3 times, dc in ch st, turn

R8 (color 3): Ch 1, sc in same st, sc in next 5 st, *sc3tog in next 3 st, sc in each of the next 12 stitches, 3 sc in next chain, sc in each of next 12 stitches, repeat from * across, sc in each of next 5 stitches, 2 sc in ch st, turn
R9 (color 2): Ch 3, dc in same st, dc in each of the next 5 ch, *dc3tog in next three chains, dc in each of the next 12 chains, 3 dc in next chain, dc in each of next 12 chains, repeat from * across, dc in each of next 5 stitches, 2 dc in ch st, turn
R10-11 (color 4): Ch 3, hbdc in same st, hbdc in each of the next 5 ch, *hbdc3tog in next three chains, hbdc in each of the next 12 chains, 3 hbdc in next chain, hbdc in each of next 12 chains, repeat from * across, hbdc in each of next 5 stitches, 2 hbdc in ch st, turn
R12 (color 3): Ch 3, dc in same st, dc, bead st, sk sp, dc, dc, bead st, sk sp, dc3tog, *dc, dc, bead st, sk sp, repeat from * to peak, 3 dc in peak, repeat again from * to valley, dc3tog, repeat from * across, 2 dc in ch st, turn

Week 1
R1: DC, Color 1
R2: DC. Color 1
R3: Bead, Color 3
R4: Herringbone, Color 4
R5: Criss Cross, Color 2
R6: Criss Cross, Color 2
R7: Criss Cross, Color 2
R8: SC. Color 3
R9: DC, Color 2
R10: Herringbone, Color 4
R11: Herringbone, Color 4
R12: Bead, Color 3
That wraps up Week 1! Week 2 will go up on April 9th!
I would love to see your progress and finished pieces. Half the joy of creating is sharing it! You can share your work here in the comments, on my Facebook page, or you can join the Couch Surfer Crocheters FB Group!
If you are on Instagram and want to share there, please tag me @couchsurfercrochet.
On to Week 2!
Please, please, please feel free to share your work with me! I would love to see your progress and finished pieces. Half the joy of creating is sharing it! You can post your work here in the comments, on my Facebook page, or you can join the Couch Surfer Crocheters FB Group!
If you are on Instagram and want to share there, please tag me @couchsurfercrochet. I’m on Pinterest and Twitter as @couchsurferarts!
Follow my blog with Bloglovin.
Looking for other patterns to try?! Check out my ETSY shop or my Ravelry store!